
How to Reprint Checks in Quickbooks?
Anúncios
If you need to reprint a check in Quickbooks, there are a few easy steps you can follow. First, open up the Quickbooks software on your computer and log into your account. Once you’re logged in, click on the “Banking” tab at the top of the page.
Then, find the account that contains the check you need to reprint and click on it. Next, click on the “View Register” option for that account. You should now see a list of all transactions for that account, including any checks that have been written.
To reprint a check, simply click on the check number and then select “Reprint Check” from the drop-down menu.
- Go to the “Vendors” tab and select the vendor whose check you need to reprint
- Click on the “Payments” tab, then click on the check number of the check you need to reprint
- A new window will open with a copy of the check
- From here, you can print or re-print the check as needed
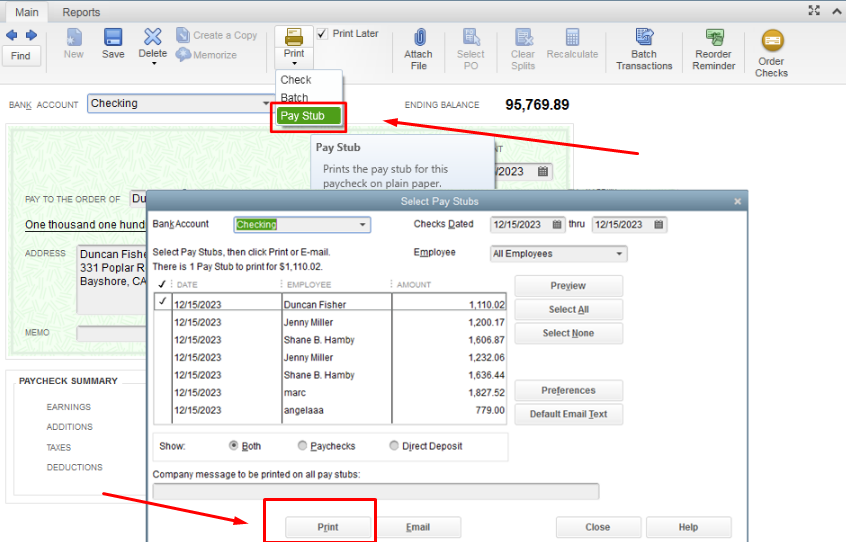
How to reprint a lost payroll check in QuickBooks
How Do I Reprint Multiple Checks in Quickbooks Desktop?
Assuming you already have the checks set up in QuickBooks:
1. Go to the Print Checks screen. You can get there by selecting Print Checks from the Write Checks window, or by choosing Banking > Print Checks from the menu bar.
2. In the first drop-down menu, choose which bank account you want to print checks for. If you only have one bank account entered into QuickBooks, this step will be skipped.
3. Enter the starting check number in the next field over.
If this is your first time printing checks from this account in QuickBooks, leave the field blank and QuickBooks will automatically assign a check number to each check as it’s printed.
4. In the From Date and To Date fields, enter the date range for which you want to reprint checks. All of the checks within that date range will be reprinted.
5a). If you want to reprint all of thechecks within that date range:Click Select All at the bottom ofthe list of checks onthe left side ofthe screen, then clickReprint Selectedat the top rightofthe screen.
5b).
Anúncios
Can You Reprint a Check?
If you need to reprint a check, you can generally do so through your bank’s online banking portal. If you don’t have access to online banking, you can usually call your bank and request a reprint. There may be a fee associated with this service.
In some cases, you may be able to go into your local branch and request a reprint as well.
How Do I Void And Reprint a Paycheck in Quickbooks?
If you need to void and reprint a paycheck in QuickBooks, there are a few different methods you can use. The first method is to simply delete the original paycheck from your QuickBooks records. To do this, go to the “Employees” menu and select “Payroll Center.”
From here, find the paycheck you want to delete and click the “Delete” button. Keep in mind that deleting a paycheck will remove any associated transactions from your books, so only use this method if you’re sure you won’t need the original paycheck for any record-keeping purposes.
If you need to keep a copy of the original paycheck for your records, you can void it instead of deleting it.
To void a paycheck, go to the “Employees” menu and select “Payroll Center.” Find the paycheck you want to void and click the “Void” button. This will leave a copy of the original check in your QuickBooks records, but mark it as voided so that it cannot be cashed.
You can then reprint the check by going to the “Print Checks” menu and selecting “Reprint Voided/Deleted Checks.”
You should only void or delete paychecks if absolutely necessary, as doing so can create some accounting complications. If possible, it’s always best to simply issue a new check with updated information rather than trying to void or delete an old one.
Anúncios
How Do I Duplicate a Check in Quickbooks?
Assuming you would like a step-by-step guide on how to duplicate a check in QuickBooks:
1. Go to the “Checks” menu.
2. Select the check you wish to duplicate from the list of outstanding checks.
If it’s a recent check, you may find it easiest to select the “Payee” column and then sort by alphabetical order to find the correct payee quickly.
3. Once you have selected the correct check, click on the “Copy To New” button in the lower right hand corner of the screen.
4. A new window will pop up asking if you want to copy just the header information or if you want to copy both the header information AND line items associated with that check.
If you only need to copy over basic information such as date, payee, etc., select “Header Only.” However, if you need to duplicate any line items listed on that original check (such as different expense account amounts), make sure to select “Copy All Lines.”
5. After making your selection, click “OK.”

Credit: techplanet.today
Quickbooks Reprint Check With New Number
If you need to reprint a check in Quickbooks but want to change the check number, there’s a easy way to do it. Here’s how:
1. Go to the Lists menu and choose Chart of Accounts.
2. Find the account that the check was written from and double-click on it to open the account register.
3. Find the check you need to reprint and click on it once to select it. Then, click the Edit button at the top of the register window.
4. In the Check Number field, enter the new check number that you want to use for your reprinted check. Then click Save & Close.
5. Now go back to the Lists menu and choose Print Checks (or press Ctrl+P).
Choose which printer you want Quickbooks to use for printing your checks – either your regular printer or a MICR (magnetic ink character recognition) printer if you have one – then click OK when prompted by Quickbooks. If you haven’t already done so, now would be a good time to load blank check stock into your printer according to your printer’s instructions – consult your printer manual if needed. Click Next when prompted by Quickbooks again after loading your blank checks into your printer.
.
6a). If you’re using a regular desktop/laptop inkjet or laser printer: When prompted by Quickbooks on which checks you want to print, select Customize Checks then click Next at bottom right corner of screen; otherwise go directly 6b).
How to Print Saved Checks in Quickbooks
Assuming you have already created and saved your checks in QuickBooks, here are the steps to printing them:
1. From the main menu, select Print Checks. If you have not printed checks before, this option may be unavailable and you will need to set up check printing first.
2. Select the account for which you want to print checks from the Account drop-down menu.
3. Enter the starting check number in the next field. This should be the next check number in sequence from the last one used (unless you are re-using old check stock).
4. Choose how many blank lines you want below each check stub by entering a value in the Lines field or selecting an option from the drop-down menu. The default is 6 lines per stub but you can change this if needed. You may also want to adjust your printer settings so that it prints correctly on your chosen paper size (e.g., letter vs legal).
5. Select whether or not you want QuickBooks to automatically fill in recipient information when printing multiple checks at once by checking/unchecking the Auto Fill Recipient Info box at the bottom of the window. If this is checked, simply enter information for one recipient and then click Print when ready; otherwise, complete fields for each individual recipient before clicking Print Checks again (see below).
6a) For single checks: Verify that all information is correct and then click Print Checks at the bottom of the window to print your check(s).
You will likely see a preview of your check(s) first; if everything looks good, simply click OK/Print to continue or Cancel to make changes as needed.”’
Assuming you have already created and saved your checks in QuickBooks, here are ”’the steps to printing them:”’
1\. From ”’the main menu,”’ select ”’Print Checks.”’
If you have not printed checks before, this option may be unavailable and you will need to ”’set up check printing first.”’
2\. Select ””’the account””’ for which you want to print checks from ””’the Account drop-down menu.””’
3\. Enter ””’the starting check number””’ in ””’the next field.””’ This should be ””’the next check number in sequence from the last one used (unless you are re-using old check stock).””’
4\.
Quickbooks Payroll Checks Did Not Print
If you’re a QuickBooks Online Payroll user, you may have noticed that your payroll checks didn’t print this week. We’re aware of the issue and our engineers are working hard to resolve it as soon as possible.
In the meantime, we wanted to let you know what’s happening and provide some instructions on how to print your payroll checks manually.
Here’s what you need to do:
1. Go to the Workers tab and select Run Payroll.
2. On the Review & Process Payroll page, select Print Checks from the drop-down menu next to How do you want to pay your employees?
.
3. Select which checks you want to print and then click Print Selected Checks.
4. Save the PDF file of your checks and then print them out on regular printer paper.
To learn more about printing QuickBooks payroll checks, please visit this Help article .
Conclusion
If you need to reprint a check in Quickbooks, there’s a few steps you’ll need to follow. First, open up the check register and locate the check you need to reprint. Once you’ve found it, click on the “Reprint” button at the top of the screen.
From there, Quickbooks will ask you to confirm that you want to reprint the check. Click “OK” and then choose how many copies of the check you need to print. Finally, click on the “Print” button and your checks should print out!


