
How to Enter Expenses in Gnucash?
Anúncios
If you use Gnucash to manage your finances, you know how important it is to keep track of your expenses. Knowing how to enter expenses in Gnucash can help you stay on top of your spending and keep better control of your money. Here’s a quick guide to entering expenses in Gnucash.
When you start Gnucash, the first thing you’ll see is the Home screen. On the left side of the screen, there is a column called Accounts. Underneath Accounts, there is a list of all the different types of accounts that Gnucash can track.
Find the account that you want to add an expense to and click on it.
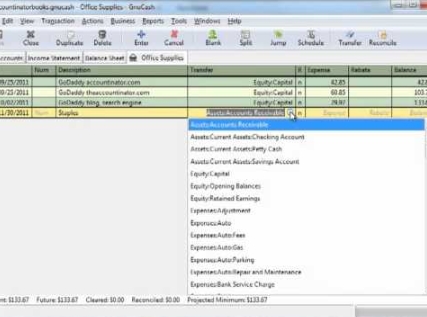
- To enter an expense in GnuCash, go to the “Accounts” window and select the account that you want to add the expense to
- In the “Transaction” column, click on the “+” button
- A new window will open where you can enter the details of your transaction
- In the “Description” field, enter a brief description of the expense
- In the “Amount” field, enter the amount of money you spent on this expense
- If you have any additional comments or notes about this expense, you can enter them in the “Notes” field
- When you are finished, click on the “OK” button to save your changes and close the window
Credit: www.youtube.com
Anúncios
How Do I Enter Transactions in Gnucash?
Assuming you would like a step-by-step guide on how to enter transactions in GnuCash:
1. Open GnuCash and select the account you want to add the transaction to. For this example, we will use the Assets:Current Assets:Checking Account.
2. On the right side of the window, click on the Transactions tab. The current month will be displayed by default, but you can change this using the drop down menu above where it says “Show transactions for:” If you need to add a transaction from a previous month or year, simply select that month/year from the drop down menu.
3. To enter a new transaction, click on the + icon at the top of the Transactions tab (it’s directly above where it says “Date”).
A new window will pop up asking for more information about your transaction.
4. In the first field, labeled “Date”, enter when this particular transaction took place using MM/DD/YYYY format (or whatever format is set under Edit->Preferences->General if that has been changed).
5. In fields labeled Description and Notes, enter any relevant information about this particular transaction that will help you remember what it was for later on (e.g., “Coffee with John” or “Dinner out with family”).
These fields are not required, but they can be helpful.”Category” will likely be auto-filled based on past transactions; however, feel free to change it if needed be.”Amount” should also be filled in – this is likely going to be a negative number since most people spend money rather than earn it!
If you need to split an amount among multiple categories (which is common when dealing with things like restaurants), simply click on Split… below Amount and fill in that information accordingly.”To:” should remain unchecked unless you are transferring money between accounts within GnuCash – leave it blank otherwise.”Reconciliation Status” allows you to keep track of whether or not you have reconcile this particular transaction with your bank statement yet; checking Off Budget here just means that this item isn’t budgeted for (again, unless you’re transferring money between accounts).
“Action” can usually just be left as New,” but feel free to experiment with different options here.”Accounts Receivable Payment”, “Invoice Payment”, etc.
Is Gnucash Good for Personal Finance?
There is no one-size-fits-all answer to this question, as the best personal finance software for each individual will depend on that person’s unique financial situation and needs. However, we can say that GnuCash is a good option for personal finance software, as it is packed with features to help users manage their money effectively.
GnuCash includes tools for tracking income and expenses, creating budgets, setting up bill reminders, reconcile accounts, and more.
It also offers support for multiple currencies, online banking connectivity, and investment account tracking. Plus, it is available for free!
If you are looking for personal finance software to help you get a better handle on your finances, GnuCash is definitely worth considering.
Anúncios
Is Gnucash Good for Business?
There is no simple answer to the question of whether or not GnuCash is good for business. The answer depends on a number of factors, including the specific needs and goals of your business. However, in general, GnuCash can be a helpful tool for small businesses and startups.
GnuCash is an open-source financial software program that can be used for bookkeeping, accounting, and invoicing. One of the benefits of using GnuCash is that it is relatively easy to use and set up. Additionally, GnuCash can be customized to fit the specific needs of your business.
For example, you can add extensions or plugins to track inventory levels or create custom reports.
Another advantage of using GnuCash is that it is free to download and use. This can be helpful for businesses on a tight budget or those just starting out.
Additionally, there is a large community of users who are willing to help with questions or problems you may have.
One downside of using GnuCash is that it does not offer as many features as some other paid options such as QuickBooks or Xero. However, if you are just starting out or have a limited budget, GnuCash can still be a good option for your business accounting needs.
How is Gnucash Used in Business?
GnuCash is a powerful open source accounting software that can be used in businesses of all sizes. It offers a wide range of features and can be customized to suit the specific needs of your business. GnuCash is easy to use and has a user-friendly interface, making it an ideal accounting solution for small businesses and startups.
How to record expenses in GnuCash
Gnucash Double Entry Accounting
If you’re like most people, the phrase “double entry accounting” probably doesn’t mean much to you. But if you’re in business, or if you’re thinking about starting a business, it’s important to understand the basics of this important accounting method.
Double entry accounting is simply a way of recording financial transactions that ensures that every transaction has two entries: a debit and a credit.
In other words, for every dollar that comes into your business, there must be another dollar going out. This may seem like common sense, but it’s actually a very powerful tool for tracking your finances and ensuring that your books are balanced.
There are several benefits to using double entry accounting:
1. It provides an audit trail. If something doesn’t add up, you can go back and track where the money came from and where it went. This is especially helpful if you have multiple employees handling money.
2. It helps prevent errors. If every transaction has two entries, it’s less likely that an error will go undetected. 3.It forces you to think about each transaction carefully.
When you have to consider both sides of every transaction, you’re more likely to catch mistakes before they happen.
4 Double entry accounting can be used for both personal and business finances. While it’s most commonly associated with businesses, there’s no reason why individuals couldn’t benefit from its use as well!
How to Use Gnucash
GnuCash is a powerful, yet free and open source accounting software that can be used for both personal and small business finances. While GnuCash may seem daunting at first, this tutorial will walk you through the basics of using the software to manage your money.
Once you have installed GnuCash, fire it up and you will be greeted by the Welcome window.
Here you can choose to create a new file or open an existing one. For this tutorial, we will create a new file. Give your file a name and click “OK”.
Now you will see the main window of GnuCash. The left pane is called the “Account Tree” and shows all of your accounts in a hierarchical fashion. The right pane is called the “Register” and shows transactions for the currently selected account.
By default, GnuCash comes with a few predefined accounts such as Assets, Liabilities, Equity, Income, and Expenses. You can add more accounts by right-clicking on an existing account and selecting “New Account” from the menu.
To add a new transaction, simply double-click on the account in which it took place in the Account Tree pane.
This will open up the Register for that account where you can enter in all relevant details about the transaction including date, description, deposit/withdrawal amount, etc. Once you have entered all pertinent information about the transaction, simply click “Record” to save it. That’s it!
You’ve just successfully added your first transaction into GnuCash!
Gnucash Expense Account
If you’re like most people, managing your finances can be a bit of a challenge. But with Gnucash, it’s easy to keep track of your expenses and make sure that your money is being spent wisely.
Gnucash is a free and open source financial accounting software program that is available for Windows, macOS, and Linux operating systems.
It has all of the features that you would expect from a good accounting program, including the ability to track your income and expenditures, create budgets, generate reports, and more.
But one of the best things about Gnucash is its expense account feature. With this feature, you can easily track all of your expenses in one place.
This makes it easy to see where your money is going each month and identify any areas where you may be overspending.
To set up an expense account in Gnucash, simply go to the Accounts menu and select “New Account.” Then choose “Expense” as the account type.
You’ll then be able to enter all of your expenses into this account, which will be organized by category (such as food, transportation, housing, etc.).
You can also use the expense account feature to set up budgets for yourself or for your family. This way, you can make sure that you’re not spending more than you can afford on unnecessary items.
And if you do find yourself overspending in one area, you can quickly adjust your budget accordingly.
With Gnucash’s expense account feature, managing your finances has never been easier!
Gnucash New User Tutorial
If you’re like most people, the thought of keeping your own financial records is daunting. But with Gnucash, it doesn’t have to be! This comprehensive tutorial will walk you through everything you need to know to get started using Gnucash, from setting up your account to tracking your transactions and managing your finances.
Gnucash is a free and open source accounting software that is perfect for individuals and small businesses. It is easy to use and comes with all the features you need to keep track of your finances.
To get started, all you need is a computer with an internet connection.
You can download Gnucash from their website or install it directly from Ubuntu Software Center (if you’re using Ubuntu). Once installed, launch Gnucash from the Dash or Applications menu.
When you first start Gnucash, you will be prompted to create a new file or open an existing one.
If this is your first time using Gnucash, select “Create A New File”. You will then be asked to enter some basic information about yourself such as your name and address. Once you’ve entered this information, click “OK” to continue.
The next screen will ask you to set up your accounts. Here, you can add all the different accounts that you want to track in Gnucash such as your checking account, savings account, credit card account, etc. To add an account, simply click on the “Add” button and enter the relevant information.
Once you’ve added all your accounts, click “OK” to continue.
The next screen will ask you how often do want Gnucash to reconcile your accounts. Reconciling refers to matching the transactions in Gnucash with those in your bank statements.
This helps ensure accuracy and prevent mistakes. For most people, reconciling monthly should suffice but if needed,you can change this setting later on by going into Edit->Preferences->Reconciliation .
After choosing how often to reconcile , click “OK” and then “Finish” on the next screen .You should now see the main window of Gnucash which looks something like this:
The main window consists of 4 areas:
1) The Accounts Tree: This shows a list of all the accounts that you have set up inGnucash along with their balances .You can use this areato quickly navigatebetween different accounts .
Conclusion
If you’re using Gnucash to keep track of your finances, you may be wondering how to enter expenses. Fortunately, it’s relatively easy to do. Here’s a quick guide on how to enter expenses in Gnucash.
To begin, open up Gnucash and find the account that you want to add the expense to. Then, click on the “Transactions” tab and select “New Expense.” This will open up a new window where you can enter all of the relevant information about the expense.
Be sure to include the date, payee, amount, and any other relevant details. You can also categorize the expense if you’d like. When you’re finished, simply click “OK” and the expense will be added to your account.


