
How to Make a Journal Entry in Quickbooks?
Anúncios
If you’re a business owner, chances are you’re using Quickbooks to track your finances. Quickbooks is a great tool for keeping track of your income and expenses, but it can also be used to make journal entries. A journal entry is a way to record transactions that don’t fit into the standard categories in Quickbooks.
For example, if you make a loan to another business, you can record it as a journal entry.
To make a journal entry in Quickbooks, first go to the “Company” menu and choose “Make General Journal Entries.” This will open up the Journal Entry screen.
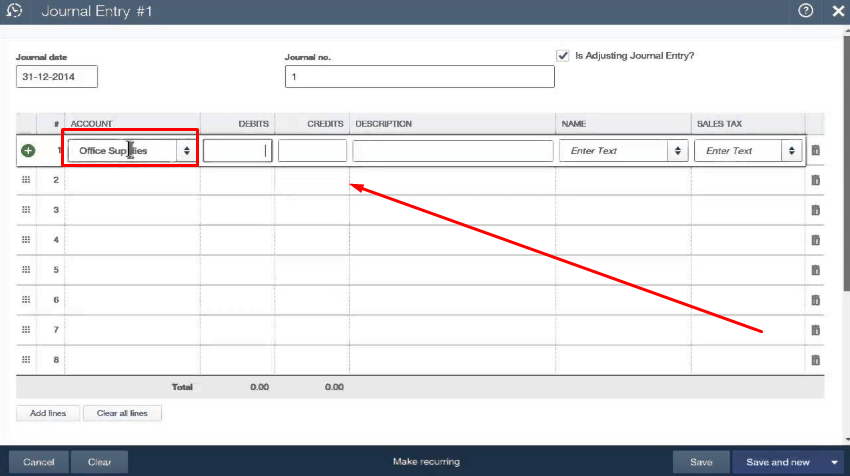
From here, you can enter the date of the transaction, the account that was affected by the transaction, and a description of what happened. You’ll also need to enter the amount of money that was involved in the transaction. If there were multiple accounts affected by the transaction, you’ll need to enter them all on separate lines.
Once you’ve entered all of the information for your journal entry, click “Save & Close” to save it. That’s all there is to it! Making journal entries in Quickbooks is quick and easy, and can be a helpful way to keep track of transactions that don’t fit into any other category.
- Open Quickbooks and select the “Journal Entry” option from the main menu
- Enter the date, reference number, and payee for the journal entry
- Select the account type and enter the amount for each account affected by the journal entry
- Enter a description of the journal entry and click “OK” to save it
How to use journal entries in QuickBooks Online
How Do Journal Entries Work in Quickbooks?
Assuming you are referring to how to create journal entries in QuickBooks, the process is relatively simple. First, go to the Company menu and select Make General Journal Entries. A new window will open where you can enter all of the relevant information for your journal entry.
This includes the date, a description, and the debits and credits for each account involved in the transaction. Be sure to click Save & Close when you are finished so that your changes are saved.
Anúncios
How Do I Enter Journal Entries in Quickbooks Desktop?
Assuming you’re using QuickBooks Desktop 2019, the process for entering journal entries is as follows:
1. From the QuickBooks Home page, click on the “Company” menu at the top, then select “Make General Journal Entries” from the list of options.
2. On the next screen, you’ll need to select a date for your journal entry.
This should be the date that the transaction actually occurred.
3. In the first row of the journal entry grid, enter a description for this transaction in the “Reference No.” column.
4. Enter debit and credit amounts in their respective columns.
When entering dollar amounts, make sure to include any decimal points or zeroes as needed (ex: 500 would be entered as 500.00).
5- To add more rows to your journal entry, click on the “+ Add Row” button at the bottom of the grid.
How Do I Make Journal Entries in Quickbooks Online?
Assuming you would like a step by step guide on how to make journal entries in QuickBooks Online:
1. Go to Company at the top, then select Make General Journal Entries under Transactions.
2. If you need to, change the date and period.
Then, enter the name or account that this entry will affect in the first column.
Use the drop-down arrow to choose an account if needed.
If this is a new account, click New to create it.
In the second column, select Debit or Credit for each row. This will automatically fill in the opposite side of the transaction in the next column over. You can leave this blank if you want to calculate it yourself.
If an amount is a credit, QuickBooks will put parentheses around it so you can easily see it’s a negative number. To delete a line item, click Delete . When done adding all lines for this entry, click Save & Close .
Anúncios
When Would You Enter a Journal Entry in Quickbooks?
There are a few different scenarios when you would need to enter a journal entry in QuickBooks. The most common reason is to adjust your books at the end of the year for things like accruals and depreciation. You might also need to make an adjustment if you find that there was an error in a previous transaction.
Finally, if you have transactions that are not able to be entered into QuickBooks directly, you will need to create a journal entry.
If you are making an adjustment at the end of the year, it is important to remember to include the date of the original transaction in the journal entry. This will help you keep track of where the money came from and make sure that your financial statements are accurate.
If you are correcting an error, be sure to put “correction” in the memo field so that you can easily identify it later on. And if you’re creating a journal entry for something that can’t be entered into QuickBooks directly, be as specific as possible in the memo field so that you remember what it was for later on.
:max_bytes(150000):strip_icc():saturation(0.2):brightness(10):contrast(5)/GettyImages-175138802-5a10087c47c266003736b90d.jpg)
Credit: www.thebalancesmb.com
How to Make a Journal Entry in Quickbooks Desktop
Assuming you’re referring to making a journal entry in QuickBooks Desktop (as opposed to another software), the process is actually pretty simple. Here’s a step-by-step guide:
1. Open QuickBooks and go to the Company menu at the top, then select Make General Journal Entries.
2. In the Date field, enter the date of the transaction.
3. In the first line of the Entry column, select an account from the drop-down menu. This is typically either an income or expense account.
If you’re not sure which one to choose, you can always look it up in your company’s chart of accounts.
4. Enter a brief description of the transaction in the Description column. This is for your own reference and doesn’t need to be too detailed.
5. In the Debit or Credit column (depending on whether it’s an income or expense account), enter the amount of money involved in the transaction. If it’s a credit, be sure to put a negative sign (-) before the amount so QuickBooks knows it’s a credit rather than a debit.
6..
How to Create a Journal Entry in Quickbooks Online
If you’re a small business owner, chances are you’re using Quickbooks Online to manage your finances. And if you’re using Quickbooks Online, chances are you also need to create journal entries from time to time.
A journal entry is simply a record of a financial transaction that hasn’t been recorded in any other way in Quickbooks Online.
For example, you might need to create a journal entry if you make a manual bank deposit that wasn’t entered into Quickbooks Online automatically.
Here’s how to create a journal entry in Quickbooks Online:
1. Go to the Gear icon in the upper right-hand corner and select “Chart of Accounts.”
2. Find the account that you want to make the journal entry for and click on it. In this example, we’ll use the “Accounts Receivable” account.
3. Once you’re on the account page, click on the “Journal Entries” tab near the top of the page.
4. On the next page, click on the “New” button in the upper right-hand corner.
5. On the next page, fill out all of the required information for your journal entry. Be sure to include both sides of the transaction (e debit and credit).
In this example, we’re crediting Accounts Receivable for $500 because we received payment from a customer. We’re also debiting Cash for $500 because that’s where the money is coming from (our bank account).
How to Make Adjusting Journal Entries in Quickbooks Online
If you’re using Quickbooks Online, you may need to make adjusting journal entries from time to time. Here’s how to do it:
1. Go to the “Company” menu and select “Make General Journal Entries.”
2. On the next page, select the date that you want the entry to be posted.
3. In the first line of the journal entry, enter a description of the transaction.
4. Enter the account that will be debited in the “Debit” column and enter the amount.
If you’re not sure which account to use, you can click on the “Accounts” button for a list of accounts.
5. Enter the account that will be credited in the “Credit” column and enter the amount. Again, you can click on the “Accounts” button if you need help finding the right account.
Conclusion
Assuming you would like a summary of the blog titled “How to Make a Journal Entry in QuickBooks?”:
The blog provides step-by-step instructions on how to create a journal entry in QuickBooks. First, the user must log into their QuickBooks account and select the “Create +” option at the top of the screen.
Next, under the “Other” column, select “Journal Entry.” The user will then be directed to a new page where they can input all relevant information for their journal entry. This includes selecting the date of the transaction, entering a description, choosing which accounts are affected by the journal entry, and entering debits and credits.
Once all information has been entered, the user can then save and close their journal entry.


