
How to Issue a Refund in Quickbooks?
Anúncios
If you need to issue a refund in QuickBooks, the process is actually quite simple. You just need to go to the Sales menu and then select Refunds. From there, you will be able to enter in the appropriate information for the refund that you are issuing.
Be sure to include the customer’s name, as well as the date of the sale and the amount of the refund. Once you have entered all of this information, simply click “OK” and QuickBooks will take care of the rest.
- To issue a refund in QuickBooks, go to the Customers menu and select Receive Payments
- Enter the customer’s name in the Received From field and select the appropriate invoice from the drop-down list
- In the Payment Amount field, enter the amount of the refund you’re issuing to the customer
- If you’re issuing a partial refund, enter the amount in both the Discount and Refund fields
- Choose how you want to issue your refund from the Refund Method drop-down list: by check, credit card, or EFT/ACH transfer (if available)
- (Optional) To track this payment with a deposit, click Undeposited Funds and then choose a deposit account from the drop-down list
- (Optional) To add additional details about this refund, such as a memo or check number, click Add New Memo at the bottom ofthe window
- Click Save & Close when finished
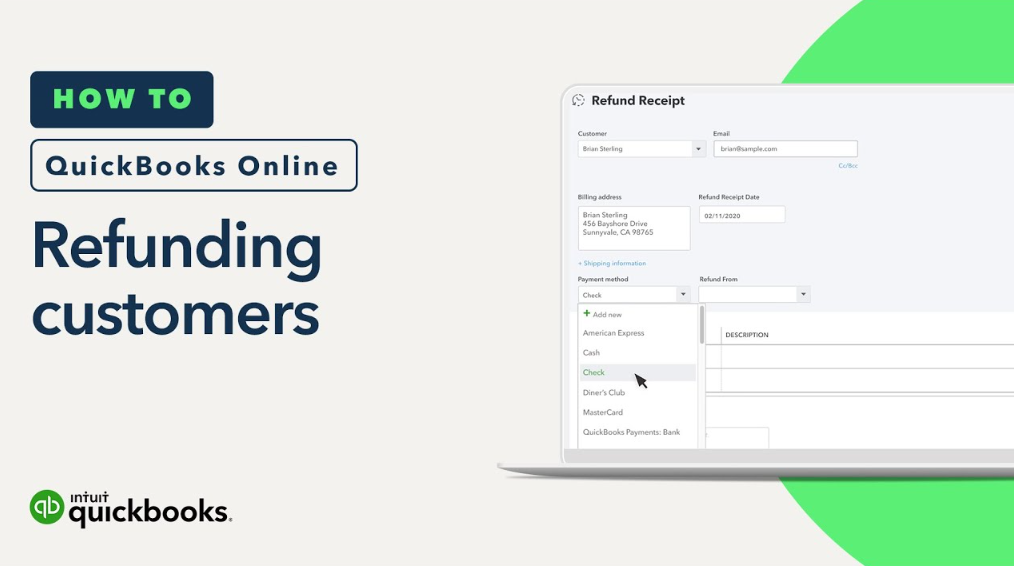
How to refund customers in QuickBooks Online
How Do I Do a Refund in Quickbooks?
When you issue a refund in QuickBooks, the money is returned to the customer from whom you originally received payment. You can issue a refund for an entire transaction or for a partial amount of the original sale. If you have already processed payments for a transaction, you will need to first void the payment before issuing a refund.
Once you have voided the payment, you can then issue a refund for the full or partial amount of the original sale.
To void a payment:
1. Go to Customers > Receipts/Credits > Void Payment.
2. Select the customer whose payment you want to void and click OK.
3.. In the Refund To drop-down list, select how you will be giving the refund (e.g., Cash, Check).
4.. If this is not already checked, check Print later so that QuickBooks saves a copy of this credit in your records without printing it now.
5..
Click Save & Close.
Now that you’ve voided the payment, you can issue a refund:
1..
Go to Customers > Receipts/Credits > Issue Refund/Credit Memo From Customer Transaction History Window OR Create New Credit Memo from scratch .
2.. Select Issue refunds only OR Include credits and refunds if there are both types available for this customer .
If there are outstanding credits on the account they will display here as well as any open invoices waiting to be paid by credits . Credits are displayed in blue while refunds due are displayed in red type . 3.. Enter information about how much is being refunded and how (e.g., cash , check # , etc .) 4 ..
Anúncios
How Do You Issue a Refund to a Customer?
When you need to issue a refund to a customer, there are a few things you need to take into account. First, you will need to determine the reason for the refund. This will help you decide how to process the refund and whether or not you will be able to offer a replacement product or service.
If the reason for the refund is due to an error on your part, then you may want to consider offering a replacement product or service. Once you have determined the reason for the refund, you will need to gather all of the necessary documentation. This includes proof of purchase, such as a receipt or invoice, as well as any other supporting documentation that may be required by your company’s policy.
After you have gathered all of the necessary documentation, you will need to contact your customer and let them know that a refund is being processed. Be sure to give them an estimated time frame for when they can expect their refund. Finally, process the refund through your chosen method and send confirmation of the refund to your customer.

Credit: www.youtube.com
Anúncios
How to Issue a Refund in Quickbooks Desktop
If you need to issue a refund in Quickbooks Desktop, there are a few different ways to do it. The most common way is to refund the customer through their original payment method. To do this, go to the Customers menu and select Refund Customer.
You can also issue a refund check from the Write Checks window or by creating a credit memo.
If you’re issuing a refund for an item that was purchased on credit, you’ll need to create a credit memo instead of using the Refund Customer feature. To do this, go to the Customers menu and select Create Credit Memos/Refunds.
Enter the necessary information and click Save & Close.
Once you’ve issued the refund, be sure to record it in your books so that your financial records are accurate.
How to Issue a Refund in Quickbooks Online
If you need to issue a refund in Quickbooks Online, there are a few steps you’ll need to follow. First, open up the transaction that you need to refund. Next, click on the “More” button and select “Refund.”
This will open up a new window where you can enter in the amount of the refund. Finally, click on the “Issue Refund” button and Quickbooks will process the refund for you.
Quickbooks Refund Customer Overpayment
If you’ve accidentally overcharged a customer in QuickBooks, don’t worry! You can easily refund the overpayment using a few simple steps.
First, open up the customer’s record in QuickBooks and go to the “Billing & Payments” tab.
Next, locate the invoice that includes the overcharge and click on it to open it up.
Now, click on the “Refund” button at the top of the invoice screen. QuickBooks will ask you how you’d like to process the refund – you can either issue a credit to the customer’s account or issue a refund check.
Choose whichever option makes sense for your business and follow the prompts to complete the process.
That’s all there is to it! Refunding an overpayment is quick and easy in QuickBooks.
Conclusion
If you need to issue a refund in Quickbooks, there are a few different ways you can do it. You can refund the entire amount of an invoice, just part of an invoice, or create a new refund check. To issue a refund, first go to the Customers menu and then select Refund Receipts.
From there, you can enter in the amount you want to refund and print out the receipt. If you’re issuing a partial refund, you’ll need to specify which items on the invoice are being refunded. And if you’re creating a new check for the refund, be sure to include all of the necessary information such as the date, payee, andamount.


