
Can You Schedule Reports in Salesforce Lightning?
Anúncios
Salesforce Lightning is a powerful CRM tool that can help businesses streamline their sales process. One of the key features of Salesforce Lightning is the ability to schedule reports. This can be a valuable tool for businesses who want to keep track of their sales progress and performance over time.
Scheduling reports in Salesforce Lightning is a simple process that can be completed in just a few steps.
- Log in to your Salesforce account
- Click on the “Reports” tab
- Select the report you want to schedule
- Click on the “Schedule Future Runs” button
- Enter the date and time you want the report to run, and select how often you want it to run
- Click on the “Submit” button to save your changes
Credit: www.godatadrive.com
Anúncios
Can You Schedule a Report in Salesforce Lightning?
Yes, you can schedule a report in Salesforce Lightning. You can do this by going to the Reports tab, clicking on the name of the report you want to schedule, and then clicking the Schedule Report button. From here, you will be able to select when you want the report to run and how often it should run.
Can You Schedule a Salesforce Report?
Yes, you can schedule a Salesforce report. To do so, go to the Reports tab in Salesforce and click on the name of the report you want to schedule. Then, click the Schedule Future Runs button in the top right corner of the page.
On the next page, you’ll need to select when you want the report to run and how often. You can also choose whether or not you want to receive an email notification when the report is finished running. Once you’ve made your selections, click Save & Run Report.
Anúncios
Can We Automate the Reports in Salesforce?
Salesforce is a powerful CRM tool, and one of its key features is the ability to generate reports. Reports are an essential part of any business, as they provide insights into performance, trends and more.
However, manually creating reports can be time-consuming and error-prone.
Thankfully, Salesforce provides the ability to automate report generation. This can save you a lot of time and effort, and ensure that your reports are always accurate.
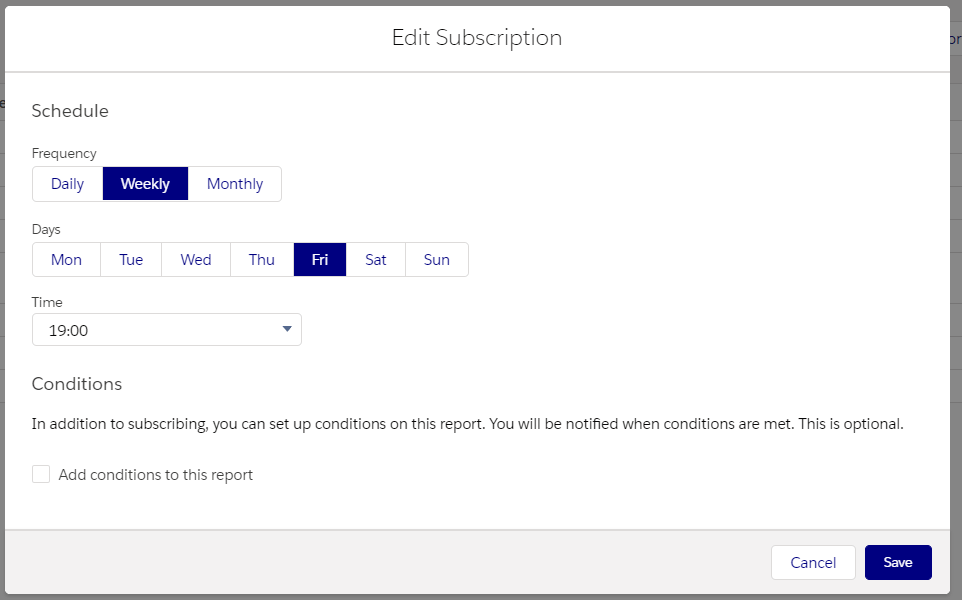
There are two ways to automate report generation in Salesforce: using Scheduled Jobs, or using Report Subscriptions.
Scheduled Jobs allow you to schedule when a report should be generated, and then automatically send it to the specified email address (es). To set up a Scheduled Job, simply go to the Reports tab in Salesforce, select the desired report, click “Schedule Future Runs” under “Options” on the right side of the page and follow the prompts.
Report Subscriptions also allow you to automate report generation, but with some additional features.
With Report Subscriptions you can specify not only when a report should be generated (on a daily/weekly/monthly basis), but also what format it should be in (PDF, Excel etc.) and who should receive it via email. You can even set up multiple recipients for each subscription. Report Subscriptions can be created from within each individual report by clicking “Subscribe” under “Options” on the right side of the page.
Simply follow the prompts to complete setup.
How Do You Schedule Reports And Subscribe to Scheduled Reports?
Assuming you would like a blog post discussing how to schedule and subscribe to reports in Salesforce:
Salesforce provides its users with the ability to schedule and subscribe to reports. Scheduling a report means that the report will be generated at a specified time, while subscribing to a report means that you will be notified when the report is generated.
There are two ways to schedule and subscribe to reports in Salesforce: using the Report Scheduling page or usingreport subscriptions.
To schedule a report, go to the Reports tab, click on the name of the desired report, and then click Schedule Future Runs in the top right corner of the page. From here, you can specify when you want the report to run and whether or not you want it to be recurring.
How to Schedule or Subscribe Salesforce Report in Classic and Lightning Experience
How to Schedule Reports in Salesforce
Salesforce is a powerful customer relationship management (CRM) software platform. One of the many features that Salesforce offers is the ability to schedule reports. This can be a helpful tool for keeping track of your sales data and performance over time.
In this blog post, we will show you how to schedule reports in Salesforce.
To get started, log into your Salesforce account and click on the “Reports” tab. Then, click on the “New Report” button.
From here, you will be able to select which type of report you would like to create. For our example, we will choose the “Opportunity Pipeline” report type.
Once you have selected your report type, you will be able to customize it further by choosing which fields you would like to include in the report and how you would like those fields to be sorted.
For our example, we will leave all of the default fields selected and sort by “Stage.”
Once you have customized your report, click on the “Schedule Future Runs” button at the top of the page. Here, you will be able to specify when you would like your report to run and how often.
You also have the option of emailing yourself or others when the report has been generated.
Salesforce Schedule Report to Email
Salesforce is a powerful customer relationship management (CRM) tool, and one of its key features is the ability to schedule reports to be emailed to you on a regular basis. This can be a great way to keep track of your sales numbers, or any other data that you want to stay on top of.
To set up a scheduled report in Salesforce, first go to the Reports tab and create the report that you want to receive via email.
Once the report is created, go to the Schedules tab and click “New Schedule.” From here, you can choose how often you want the report to be emailed to you, as well as any other options such as which format you’d like it in (PDF, Excel, etc.)
Scheduling reports in Salesforce can save you a lot of time and hassle by keeping important data right at your fingertips – give it a try today!
How to Subscribe to a Report in Salesforce Lightning
Salesforce provides a great feature called “Reports” which allows users to view data in a tabular format. This feature is available in both Salesforce Classic and Lightning. In order to subscribe to a report, follow these steps:
1. Navigate to the report you want to subscribe to.
2. Click on the Subscribe button (it looks like a little RSS icon).
3. Enter your email address and choose how often you want to receive the report (daily, weekly, etc.).
4. Click Subscribe!
That’s it! Now you will receive an email each time the report is generated with updated data.
Salesforce Report Schedule Vs Subscribe
Salesforce offers two great options for staying up-to-date on your data: report schedules and subscriptions. Both have their own strengths and weaknesses, so it’s important to understand the differences before deciding which one is right for you.
Report schedules are great if you need to generate a report on a regular basis but don’t need real-time results.
For example, if you want a monthly report of your sales data, a schedule is the way to go. Schedules can be set up to run automatically at regular intervals, so you don’t have to remember to run the report yourself.
Subscriptions, on the other hand, are best for when you need immediate results or want to share reports with others in near-real-time.
With a subscription, you can choose to have a report emailed to you as soon as it’s generated, or sent at a specific time each day/week/month. You can also subscribe others to receive the report, making it easy to keep everyone in the loop.
Conclusion
Salesforce Lightning is a powerful CRM tool that can help sales teams boost their productivity. One of the great features of Salesforce Lightning is the ability to schedule reports. This means that sales teams can automatically generate reports on a regular basis, making it easy to track their performance and progress over time.
Scheduling reports is a simple process, and it can be done directly from the Salesforce Lightning interface.


